This page provides some information about the Simple Mapper tool, and how to create maps with it.
Simple Mapper provides the ability to build a map of your production enviroment with only a few clicks. It uses reference points to correct the inherent odometry errors of the robot (see Introduction to the mapping process for further information).
- General usage
- Select mapping method
- Managing reference points (not necessary for GMapping)
- Recording the mapping data
- Interaction while recording
- Building the map
- Parameters
General usage
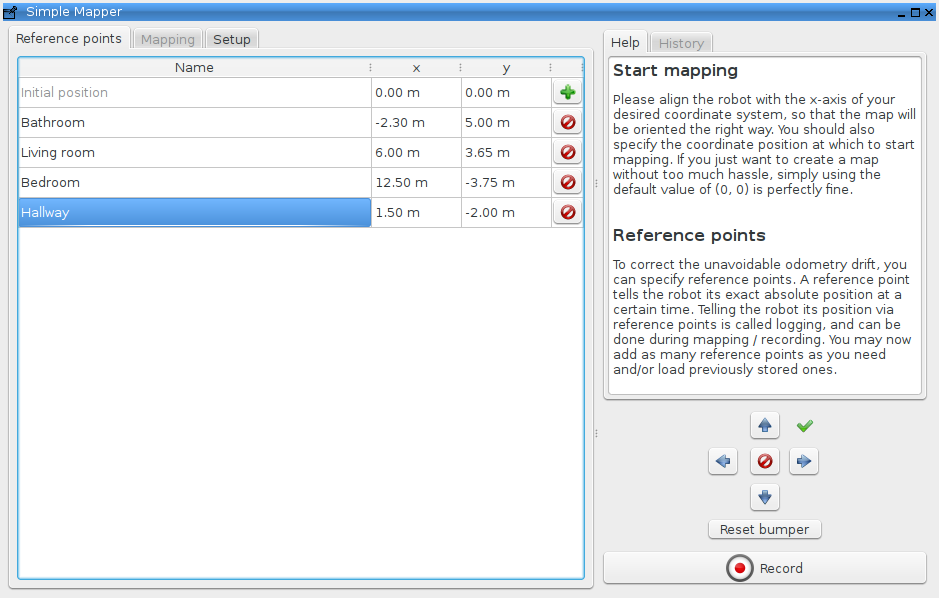
First, open the tool in miracenter using "Window -> Show views" (or by pressing CTRL+D) and selecting the entry Simple Mapper in the "Mapping" category. You should see a window like the one pictured below, even though the size and appearance of the tool may vary depending on your operating system and previous configuration.
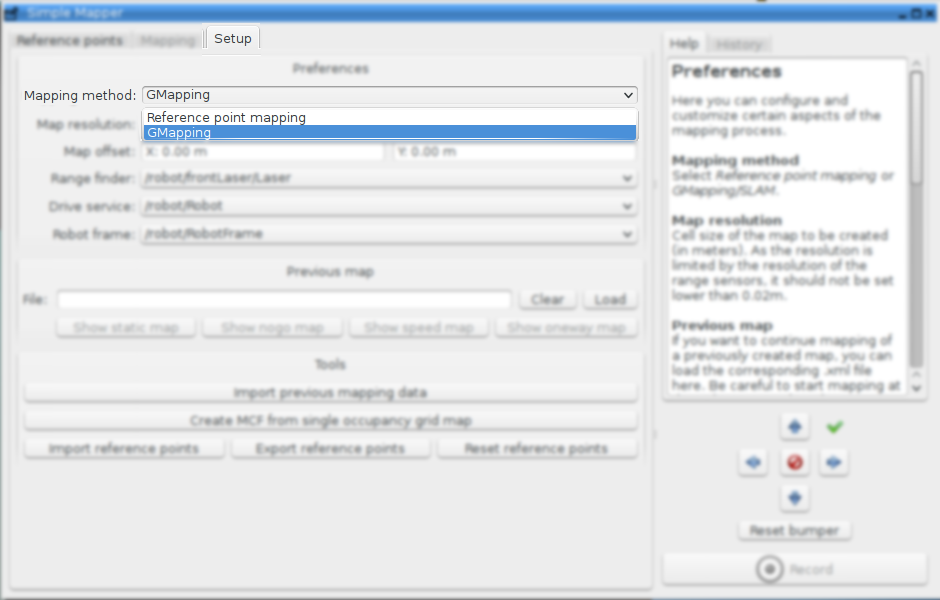
Select mapping method
As the first step, the desired mapping method should be selected in the tab "Setup". By default, the Reference point mapping is selected. To be able to use GMapping the toolboxed GMapping and GMapping module must be installed on the system.
Managing reference points (not necessary for GMapping)
To add a reference point, click the green Add (+) button on the right hand side. This will add an entry to the list of reference points, which you can edit in-place by double-clicking on the values. Each point has a Remove button (last column), that will remove it from the list of available reference points. Using the Export reference points and Import reference points buttons in the "Setup" tab, the list of reference points can be saved to harddisk or restored from it. It is a good idea to save the reference points if you plan to map this area again (e.g. after some inventory has been moved around).
It is also possible to start mapping without using reference points, e.g. for small areas.
Recording the mapping data
After specifying all required reference points, the area to be mapped needs to be recorded. Please align the robot parallel to the desired x axis of your coordinate system. This ensures that the map is aligned correctly and makes extending the map easier later on. You may also specify the map coordinates / position where you want the mapping to start.
If you are unsure, just align the robot parallel to the nearest outer wall of your building. Using (0,0) as starting coordinates is the default, and a perfectly fine choice. Only change this if you need the map to start somewhere else.
To start recording, click on the red Record icon on the lower right side. The tool will now switch to recording mode and will start to record data.
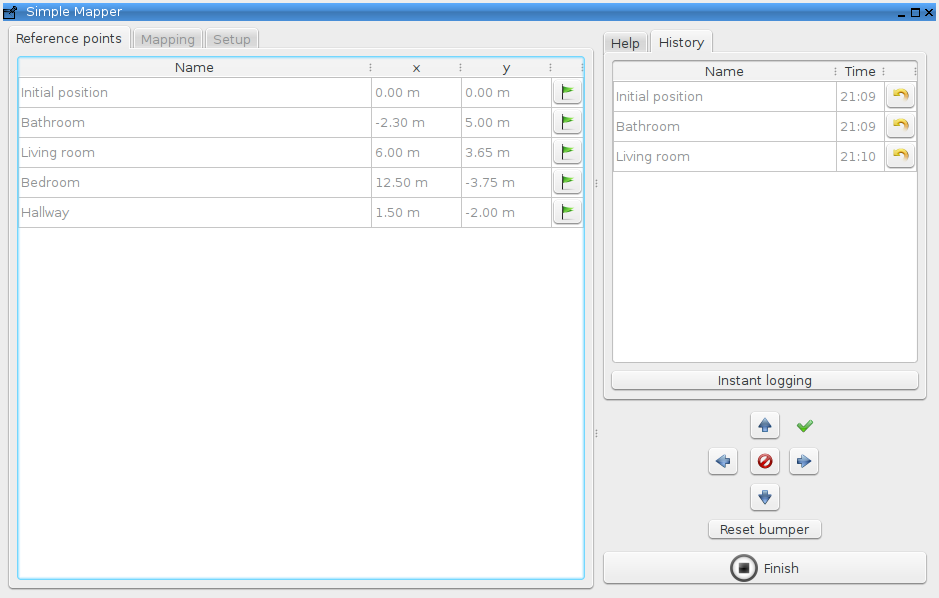
Each reference point's "Remove" button has now changed to a "Log" button, which will log the corresponding point when clicked. If you haven't specified reference points or have forgotten one, you may use the separate Log button to directly log the robot's position. Think of this feature as one-time creation and logging of a reference point.
Interaction while recording
To the right, there are two widgets for your convenience:
- Logging History widget
- Drive widget
The Logging History widget enables you to keep track of the chronological order of reference point logging events. More importantly, this widget provides the ability to Undo the logging of a reference point by using the small "Undo" buttons next to each history entry. In non-trivial mapping environments, and when using touchscreens, it is easy to log the wrong reference point by accident, which would distort the driven path and corrupt the recorded map. If this should happen, simply undo the logging using the Logging History widget.
The Drive widget connects to your robot's drive interface and enables you to send driving commands to the motors. While the widget's buttons can be used to drive the robot, it is much more intuitive and comfortable to use the arrow keys on your keyboard to drive. While the drive widget is active (i.e. focused), the following key mappings hold true:
- Left: Increase rotational velocity (i.e. steer left).
- Right: Decrease rotational velocity (i.e. steer right).
- Up: Increase translational velocity (i.e. accelerate) and reset rotational velocity.
- Down: Decrease translational velocity (i.e. deccelerate) and reset rotational velocity.
- Space or Ctrl: Reset translational velocity (i.e. stop robot).
The green arrow in the upper left corner of the drive widget indicates whether it is currently focused and therefore enabled for keyboard control. If the focus is lost, the icon will switch to a red cross. If you should happen to bump into an obstacle, you can unlock the robot's safety mechanism (i.e. disabling the motors on contact with an obstacle) using the Reset bumper button. If the robot doesn't move despite sending drive commands, you may need to try a different drive service in the preferences.
While recording, you should drive the robot around, making sure every part of the environment is sensed by the robot's range finder. Whenever the robot arrives at the position of a previously defined reference point, use the corresponding button to log that position. These reference positions will then be used to correct the robot's path when creating the map.
Building the map
To stop recording, click the black Stop button. The tool will now start building the map using the recorded data. The progress bar will keep you up to date about the progress of the operation (see image below).
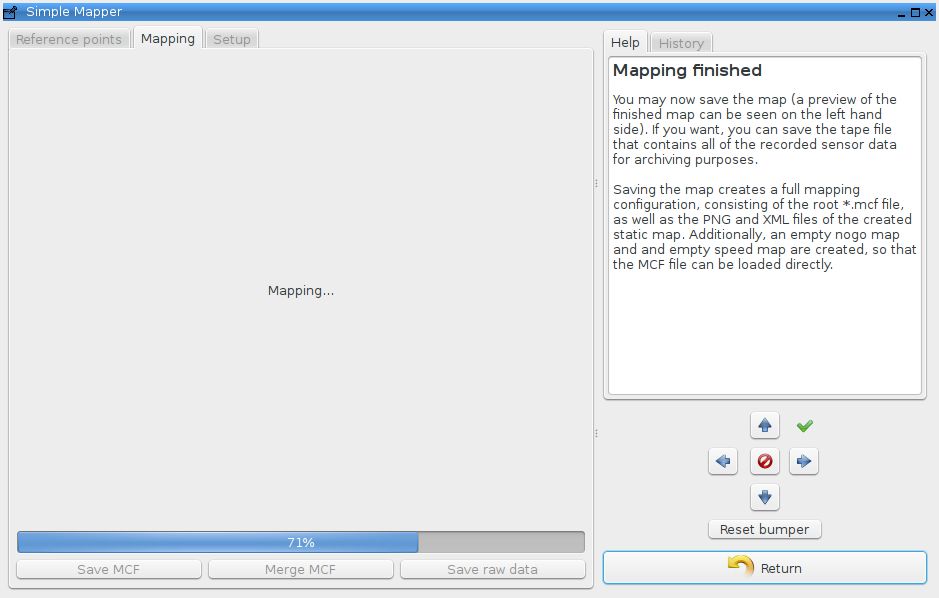
As soon as the mapping has finished, the generated map will be displayed. You can now save the map using the Save map button on the lower right side. Specify a filename and directory, e.g. "map". The tool will then create the necessary files for the created map, including templates
for nogo and speed maps. To reset the tool to its initial state, click the Return button.
In case you want to store the mapping data for archiving or later use, you can use the Save mapping data button to store the tape file (.tape) and the descriptive mapping data file (.mdata.xml). The mapping data file can be imported again later.
See Map Configuration Files (MCF) for further information about the MCF file format used by default.
Parameters
Because the tool is meant to be simple, there are few customizable parameters. To access those options, use the Setup tab (only available before recording or mapping starts).
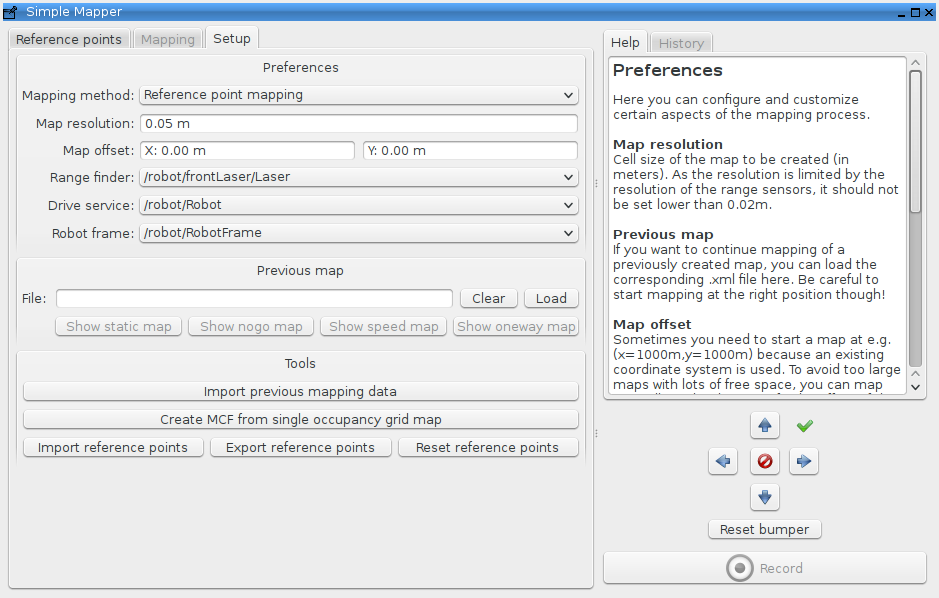
The parameter Mapping method defines the mapping method.
The parameter Map resolution allows specifying the cell size of the grid map that will be created (in meters). The bigger the cell size, the fewer details the map will contain.
The parameter Previous map allows specifying an *.xml of a previously generated map, which is supposed to be used as a starting point for mapping. This allows "iterative mapping", e.g. first mapping one half of the area, saving the map, and then mapping the other half, using the first map as the starting point, i.e. specifying it as the "Previous map".
The parameter Map offset allows specifying a coordinate offset, if the mapping takes place at a significant distance to the coordinate system origin (0,0). This enables producing small map files by translating the origin by the specified offset.
The parameter Range finder allows selecting the range finder that while be used for mapping. Every channel providing RangeData is considered and listed here.
The parameter Drive service allows selecting the drive service that should be used for driving, in case your robot has several drive or motor controller interfaces.
The parameter Robot frame allows selecting the frame of your robot's odometry. Most likely you should not have to touch this setting. If your map appears to be collapsed to a small area, it is possible that the robot frame isn't set correctly.
The button Import previously recorded mapping data allows importing a previously recorded and archived mapping data file (.mdata.xml) and its corresponding tape file (.tape). If the import was successful, mapping will immediately start using the current parameters.