This page provides some information about the Simple Map Editor tool, and how to edit maps with it.
Simple Map Editor provides the ability to load MCF files (see Map Configuration Files (MCF)) and edit the contained static-, nogo- and speed maps. Every change is stored persistently and independently from the corresponding map PNG to allow easy updating of previously edited maps.
- General usage
- Static map editing
- Nogo map editing
- Speed map editing
- Undo and Redo
- Accessing the edited maps
- Edit and publish maps at runtime
General usage
Simple Map Editor can load MCF files using the Load button in the lower right corner. After editing any of the maps, you can save the changes to the MCF and PNG files by using the Save button. To switch between the three editing modes, you can use the Mode dropdown box in the bottom control bar below the map view.
The bottom control bar consists of the following functionality groups:

- Zoom control: Zoom in, Zoom to fit the map into the view, Zoom out
- Undo/Redo: Undo the previous action, Redo the previously undone action
- Editing mode tools: Specific to the current editing mode, e.g. "Select, Pencil" in static map editing mode.
- Mouse cursor information: Translates the current mouse coordinates into map coordinates.
- Editing mode: Enables switching between the three distinct operational modes.
Besides the zoom control and the mouse cursor information, most controls are specific to the currently selected map editing mode and will change according to the selected mode.
Static map editing
After loading a map, you will see the first of three distinct operational modes - the (static) map editor mode:
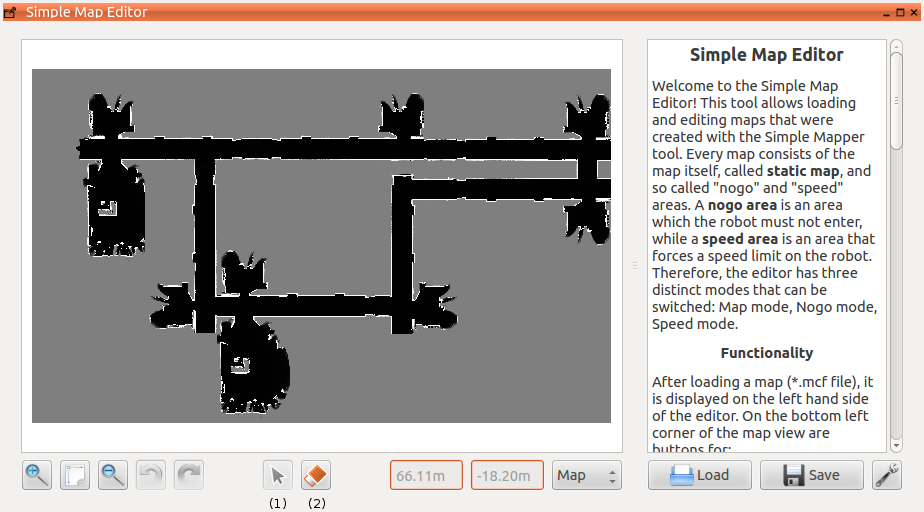
In this mode, you can pan and zoom around the map using the mouse when then select tool (1) is activated. With this tool activate, a left mouse click and hold enables panning, while the mouse wheel allows for zooming. Note that zoom level can also be changed using the zoom control buttons.
The main editing tool in this mode is the pencil tool (2) - it allows drawing into the map to erase impurities, wrongly mapped areas and so on. You can select from different pencil sizes and shapes, as well as adjust the color - you can either draw in the color of obstacles, freespace or uncertain areas. The freespace and obstacle colors automatically adept to your occupancy grid map's color palette, while the uncertainty color is always 0x7F7F7F.
Nogo map editing
The nogo map editor mode enables creating and editing nogo areas:
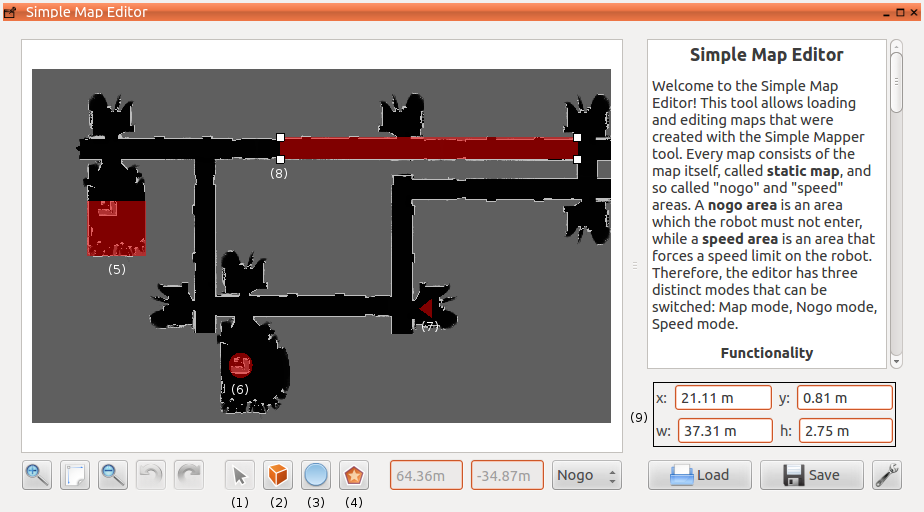
This mode has other tools than the static mode, to accomodate for the creation and manipulation of nogo areas. The select tool (1) retains the same panning and zooming functionality, but adds the ability to select already created nogo areas (see example areas (5), (6), (7) and (8)). When an area is selected, its data is displayed in an informative widget (9). More importantly, selected areas can be dragged around when left clicking and holding. Even more importantly, a selected area can be transformed by left clicking and dragging the resize handles (8).
The rectangle tool (2) allows creating new rectangular nogo areas. To create one, select the tool and then left click and hold somewhere in the map. Drag the mouse to span the rectangle, and finally release the left mouse button to create the rectangular nogo area.
The ellipse tool (3) allows creating new elliptical nogo areas. It works the same way as the rectangle tool does, as elliptical nogo areas are described and spanned by their bounding rect.
The polygon tool (4) allows creating new polygonal nogo areas. After selecting the tool, each left click within the map will add a new point or rather corner to the polygon. To close the polygon, use the button appearing in the upper right corner of the map view, left click on the first point again or perform a right click. The polygonal areas need not be convex, they may even be self-intersecting.
To delete any area, press the DEL key on your keyboard or use the button in the upper right corner of the map view.
Speed map editing
The speed map editor mode enables creating and editing speed areas:
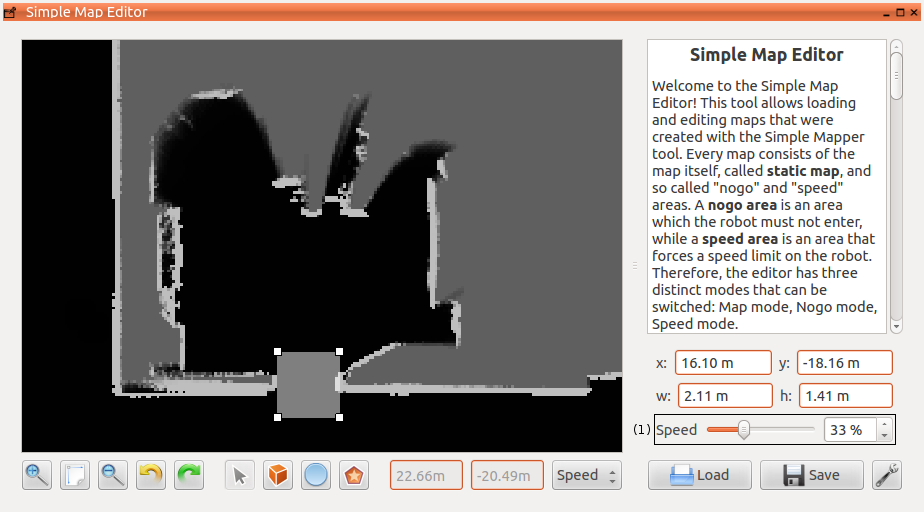
This operational mode provides the same functionality and tools as the nogo editor mode, with one distinction: Each speed area is associated with a certain speed. To edit the speed of an area, select it using the select tool. This will open the informative widget, which provides the speed control (1) indicated in the image above. The change in speed will be visually reflected - the smaller the speed, the more translucent the area becomes. Note that for the sake of usability, even areas of 100% speed are still a little translucent.
Undo and Redo
Almost every possible action in Simple Map Editor is recorded and can therefore be undone, or restored if it was previously undone. To access this functionality, use the buttons in the lower left corner (see General usage).
- Undo button: Undoes the previous action. Will become deactivated when there is nothing to undo.
- Redo button: Restores the last undo action. Will become deactivated when there is nothing to redo.
You can also use the keyboard shortcuts CTRL+Z (undo) and CTRL+Y (redo).
Please make note of the following:
- If you undo several actions and then perform another action, the undo/redo stack gets cleared up to this position. You cannot restore the previously undone actions!
- The undo/redo functionality is bound to the current map editing mode, i.e. actions in the nogo map editing mode cannot and should not be undone in e.g. the speed map editing mode.
Accessing the edited maps
Using the save button in the lower right corner, the changes made will be stored to the map files. This involves the following:
- Static map changes: The original map will be retained; all changes are saved as a new file "mapname.png.new".
- Nogo area changes: All nogo areas will be rendered to the corresponding PNG file "mapname-nogo.png".
- Speed area changes: All speed areas will be rendered to the corresponding PNG file "mapname-speed.png".
A complete map file structure (see Map Configuration Files (MCF) for more information) may look like this:
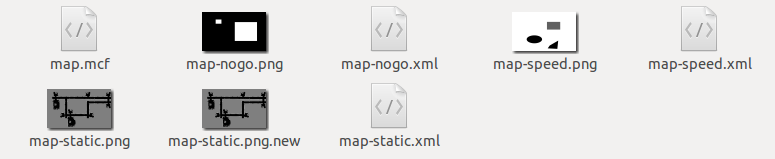
These files can now be loaded by tools like the MCFLoader or the OccupancyGridLoader.
Edit and publish maps at runtime
Sometimes, it may be desirable to edit maps directly in the production environment. Simple Map Editor doesn't interfere with the instance of MIRA it is running in, so maps can be safely edited in any running instance. To avoid having to restart MIRA with the new maps, Simple Map Editor provides the ability to publish the maps directly into channels. To use this feature, switch to the preference screen by pressing the wrench icon in the lower right corner:
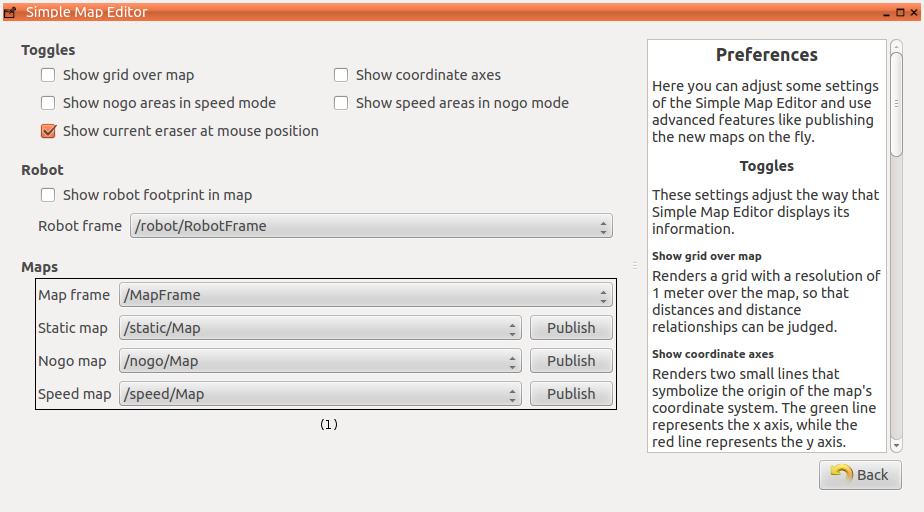
The map publish area (1) provides a list of possible channel candidates for every of the static, speed and nogo maps. Only channels of type mira::maps::OccupancyGrid are considered, and regular expressions are used to try to guess which channels are right for what kind of map. Still, be sure to check that the right channel is selected, to avoid publishing the right map into the wrong channel!
To publish the current version of the static, nogo or speed map, just press the publish button and the map will be rendered and published to the selected channel immediately.