| Previous: Tutorial: Getting in touch with miracenter | Next: Tutorial: Remote Procedure Calls (RPC) |
|---|
Prerequisites
This tutorial assumes that you have completed Tutorial: Creating a Unit that Subscribes to Data .
Introduction
In this tutorial we get back to our MeanCalculator unit from the previous tutorial. This unit still computes the moving average using a window of 10 float values that are read from a channel.
So far, this window size was hard-coded, which is a bad practice as the user of our unit may want to vary this size. Hence it is desirable to specify the window size as parameter in our configuration file.
Adding a Parameter
MIRA provides a simple but powerful mechanism to add such parameters. All we need to do is to add a member variable that takes the window size and reflect it in the reflect method of our Unit:
Now, MIRA's serialization concept is able to store and load our Unit including the "WindowSize" parameter, which can be specified easily in our configuration XML file as follows:
Within the Unit's node in the configuration file, the parameter is stored using the name that is given as first parameter of the call to member() within our reflect() method. If we do not specify this parameter in the configuration file, a default value of 10 will be used, as specified as last parameter in the call to member(). In case we did not provide a default value there and the parameter is not specified, the instantiation of the unit fails with a corresponding error message.
Adding a Property
Beside parameters, MIRA also allows you to add properties to your units. In contrast to parameter, the values of properties can be altered at runtime using a property editor, that e.g. is contained within the miracenter.
To turn our WindowSize parameter into a property, we just have to call the property() method instead of the member() method. Hence, our reflect() method will look as follows:
Now, the value can still be specified within the XML configuration file and additionally be altered at runtime.
Using Getters and Setters
However, for some properties it is important to perform certain actions, whenever the value of the property is changed. In our MeanCalculator unit for example we use a queue to store the values within our "window". If the user decreases the window size, we have to remove some of these values to shrink the queue to the new requested size.
For this purpose, MIRA's serialization concept supports "setters". Setters are methods that are called to set a certain property when its value should change. The advantage of using a setter method is that in addition to just writing a new value to the respective member variable, it can perform any preparation or maintenance work associated with changing a property.
To use a setter for our property, we need to modify our reflect() method as follows:
The third parameter specifies the setter of type "int" as method of our Unit class.
The new setWindowSize() setter method takes the new value of the property as parameter.This new value now needs to be set to our mWindowSize member explicitly within the setter method and additionally we can truncate our queue as desired:
Don't forget to replace the hardcoded value inside the onNewData() function with mWindowSize:
In some cases you additionally may want to specify a getter method, that is called whenever a certain value is read, for example when you are doing a conversion between different units (e.g. degree to rad) or when the property does not correspond to a member of your class and must be computed or generated explicitly whenever it is queried.
If we used a getter method for our WindowSize member, our example would have to be modified as follows:
Read-only Properties
Sometimes you may also want to provide the user some useful information that is shown in the property editor but can not be altered, e.g. sensor readings like temperatures, etc. We call these properties read-only properties. You can specify them similar to normal properties within the reflect() method by using roproperty. In our example, we can add a read-only property that shows the current size of the internal queue as follows:
Playing around
As in the other tutorials you can now compile the modified unit which should look like this.
Afterwards, launch the application using miracenter that you got to know in the preceding tutorial:
You should again see the main window with the "Channel View" on the left side. On the right border you should see the "Authority View" that lists our two units that are running. Below, you can see the "Property View". This view is context-sensitive, i.e. its content shows the available properties of the currently selected item, if any. In order to edit the properties of our MeanCalculator unit, you need to select that unit in the "Authority View". (Note, that we have called it "MyMeanCalculator" within our XML config file) Afterwards, you should be able to see the properties of the unit:
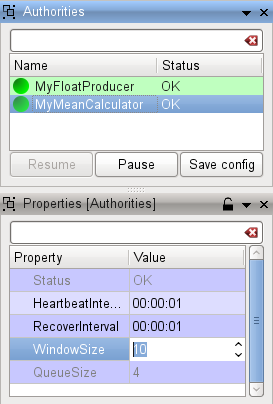
Now, you can play around with the values of our properties and should see the effects of your changes instantly. To get help for a property, its description is available as tooltip.
| Next: Tutorial: Remote Procedure Calls (RPC) |
|---|