| Previous: Tutorial: Creating a Domain | Next: Tutorial: Creating a Unit that Subscribes to Data |
|---|
Prerequisites
This tutorial assumes that you have created a domain as described in the previous tutorial (Tutorial: Creating a Domain).
Introduction
Units are the software modules that perform the actual tasks and computations of the modular application. They implement the algorithms, e.g. for path planning or localization. Units are implemented as shared libraries. They are loaded and instantiated and finally executed when a configuration file is launched by the mira or miracenter tool.
We can differentiate between two kinds of Units: Units that are solely reactive and have no worker thread can be implemented as so called MicroUnit. Units that are active and do have a worker thread to perform cyclic operations and computations can be implemented as Unit.
This tutorial covers how to create and implement a Unit and how to compile and use it. The Unit created in the tutorial is a simple "publisher" that creates and publishes data in form of an increasing float value. That data can be consumed and processed by other Units, that will be implemented in the following tutorials.
Creating the Unit
To create the Unit we again use the mirawizard tool.
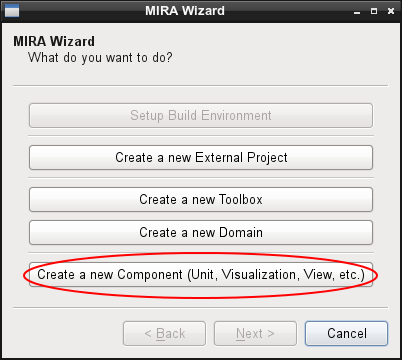
- Choose "Create a new Component"
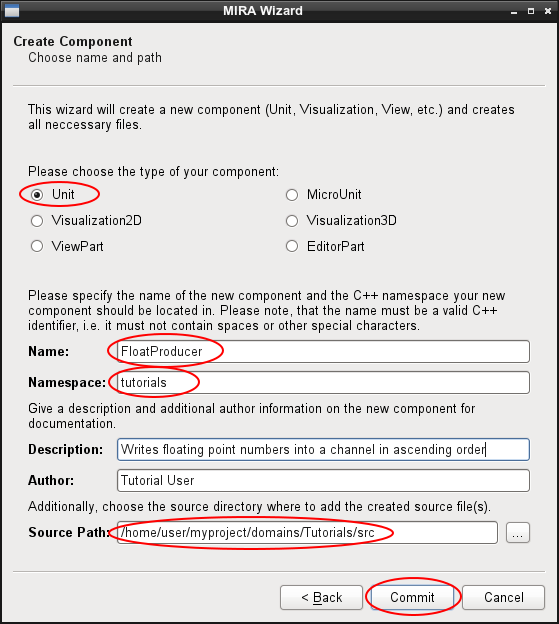
- Now select "Unit" as component type.
- Specify the name of the Unit, which will be its class name and hence must be a valid C++ identifier. In this tutorial, we create a Unit called "FloatProducer".
- Specify the namespace where the created Unit class should be located in. This usually should be the namespace of the domain that contains the Unit. In our example, we use the namespace "tutorials" of the Tutorials domain that we have created in the previous tutorial.
- Again, you can specify a detailed description of the Unit and the name(s) of the author(s).
- Finally, you need to specify the directory, where the wizard will create the source file for the Unit.
The Code
After that, you will find a new source file in your project directory called domains/Tutorials/src/FloatProducer.C. It contains the complete code for an empty Unit:
Examining the Code
Before we start to fill our Unit with life, let's analyze the generated code line by line:
Including the Unit.h header allows us to use the main parts of the MIRA API. Since most MIRA components are located within the mira namespace, adding the using directive allows us to use those components without explicitly specifying the mira namespace.
Here, the class of our Unit is declared. It is derived from mira::Unit, the base class for all Units. Note that the MIRA_OBJECT macro must appear in the private section of our class. The macro creates some static code in the class and is needed by MIRA's class factory.
The reflect() method can be added to any class. It is used by MIRA's serialization framework to serialize and deserialize instances of the class. When used in Units, it additionally allows to specify parameters and properties, as well as methods for remote procedure calls (RPC). We will come back to this in later tutorials. In this tutorial, we do not need to make any changes, you could even delete the reflect() method completely here.
In the constructor of our Unit, we explicitly call the constructor of our Unit base class. As parameter, we need to specify the default cycle interval of our Unit. The process() method of our Unit will be called continuously in the specified interval.
The initialize() method of our unit will be called once, right after the Unit was created and its parameters and properties were fully initialized. We will see that this method usually is the right place where to publish and subscribe to channels.
As mentioned above, the process() method is called repeatedly with the specified interval. It usually is used as the "worker method" where the actual computation takes place, as shown below.
Implementing a Publisher
Now, as we have studied the main parts of a Unit by examining the auto-generated code, we can start to add a few lines of code that fills our Unit with life.
As stated at the beginning, we want to implement a Unit that generates and publishes a simple floating point value that is increasing steadily. This value should be published in a Channel so it can be consumed by other Units of our modular application.
Before we can write a value to other Units, we need to publish a Channel. As already mentioned, the initialize() method is a good place to do this. We therefore extend that method by a single line, as follows:
In the call to the publish() method, we first need to specify the type of the channel as template parameter. In our case, we want to write a float value. Moreover, we need to specify the name of the channel. Here, we simply call our channel "FloatChannel".
The publish() method will return a channel object that we store in our mFloatChannel member variable, which we also need to declare in our class declaration:
We also need to add a member variable that holds the float value we want to publish:
We can initialize this value with 0 in the constructor of our Unit class or in its initialize() method:
Finally, we still need to adapt the value and publish it to our channel. As stated above, the process() method is the working horse of our Unit and it is the place where we usually do our computations. Therefore, we extend that method as follows:
We first increase the float value by 1 and then we post that value into our channel to make it available for other Units. For demonstration purposes, we additionally write a short message to the console.
As specified in the constructor of our Unit in the auto-generated code, the process() method is called every 100 milliseconds by default. Hence, our value will be increased and published 10 times per second.
Building the Unit
After the above changes, the code of our Unit should now look like this.
The mirawizard has also added the following lines to the CMakeLists.txt file of our domain:
It tells our build system to create a new shared library from our source file, that is linked against the two main MIRA libraries "MIRABase" and "MIRAFramework".
We do not make any additional changes here and can build the Unit by typing
within our project's root directory.
Launching the Unit
To start our new Unit we need to create a launch configuration file. This file is an XML file that specifies the Units that shall be instantiated and started. Furthermore, it allows to configure the Units by specifying parameters.
The configuration files for Units usually reside in their Domains within the "etc" subdirectory. We therefore create a new file domains/Tutorials/etc/Tutorials.xml with the following content:
Within a root node that is required by the XML standard, we specify our Unit that we want to be loaded using the <unit> tag. We need to specify an id which must be a unique name. We choose "MyFloatProducer" here. Moreover, we need to specify the class of the Unit. It must be the fully qualified class name, i.e. the namespaces must be included. The Unit class that we have created in this tutorial is "tutorials::FloatProducer".
Finally, we can start our Unit by typing:
mira is a command line tool, that starts a new MIRA process. It loads the specified configuration files and instantiates and starts the contained Units.
On the console we should now see the output of our Unit:
The process can be stopped by pressing Ctrl+C. This signal will orderly shutdown all Units and terminate the application.
Now that you know how to create and start Units, you are well prepared for the upcoming tutorials that will lead you through the features of MIRA.
| Next: Tutorial: Creating a Unit that Subscribes to Data |
|---|