| Previous: Tutorials for Developers | Next: Tutorial: Creating a Domain |
|---|
Prerequisites
This tutorial assumes that you have installed MIRA as described on the Installation page. Moreover, you should be familiar with working in a console. Well at least you should know how to use the 'cd' command ;) (On Linux, it is strongly recommended you know what type of shell you are using and how to modify and use the shell startup script.)
Introduction
On the coarsest level, MIRA is organized in so called "Projects". A single project contains the source code and related files of components that are somehow related to each other in an infrastructural point of view, e.g. since they are developed by the same author, or group of authors, or since the code is located on the same repository.
An empty project only contains the files that are necessary for building the components within the project. The components themselves are located within Toolboxes and Domains, which we will explain later.
For creating new project directories with all necessary files, the basic MIRA installation offers the mirawizard. It is a tool for the simple creation of the different structural compounds like projects, toolboxes, domains and the contained software components.
Creating a Project
- Start mirawizard > mirawizard
You should now see the following window:
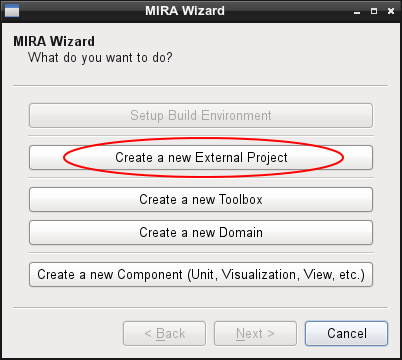
- Choose "Create a new External Project"
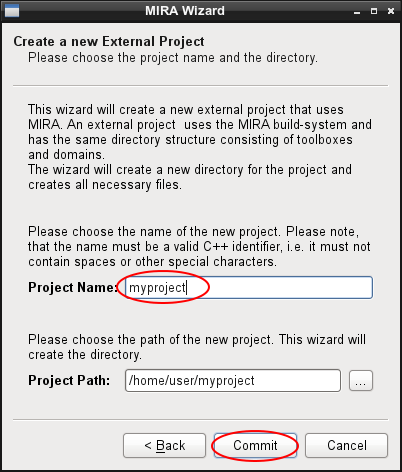
- "External Project" means that this project is based on MIRA, but resides within its own path, separate from the original MIRA installation. Choose a proper project name. The name probably depends on whether the project is for your personal development only or if it is a bigger project shared by several developers for example. In this tutorial we create a new "personal" project called "myproject".
- Optionally modify the project path where the project should be located on your local file system.
- Choose "Commit". The wizard will now create the chosen directory and all necessary files including the build environment, etc.
- Each project path must be added to the MIRA_PATH environment variable. The wizard will try to do this automatically for you by adjusting the shell startup scripts on Linux or Windows path settings. So on most systems it is sufficient to proceed by clicking "Commit".
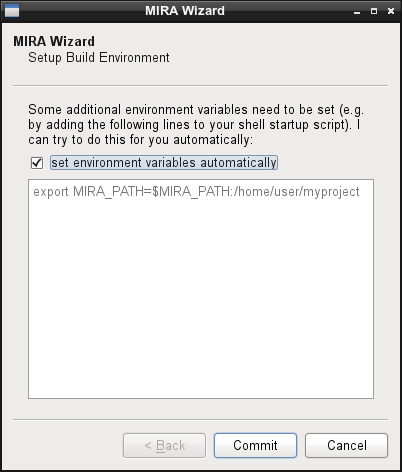
If the wizard is not able to perform the necessary changes automatically, you need to do this manually, e.g. by pasting the the specified text in the above text field into your startup script (.bashrc, etc).
- If the changes were done successfully, you will see the following message:
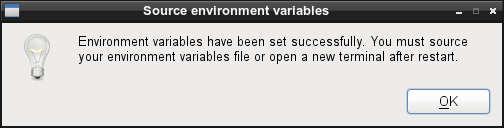
It tells you to source your bash startup script (or equivalent in other shell types) before you can start working with the new project. We will do that afterwards.
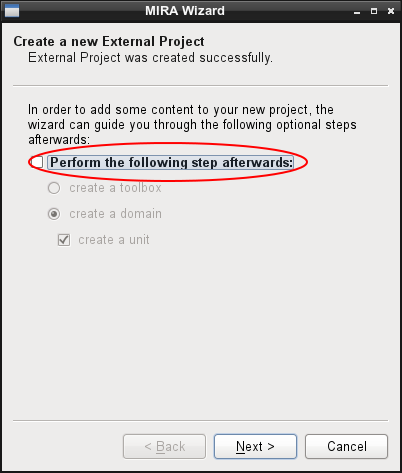
- In the final step you can choose additional actions you want to perform. For now, we are happy with the created project and uncheck the checkbox:
Click Next and Commit to close the wizard.
- After the wizard has terminated, we need to source/execute the shell startup script, in order to make the new environment variables available in the current shell. Using Linux and bash, we can do so by typing in the console (if you are using a different shell type, use the appropriate command). Alternatively, we can simply start a new console, where we can continue to proceed with the next tutorials.> source ~/.bashrc
Working With the new Project
Now you can examine the directory that was created by the wizard by going into your project directory:
It should contain the following directories and files:
The files are part of the generated build environment. If you are located within your project directory, you can start to compile your project by typing:
However, at the moment there is no content yet and the build process will finish immediately.
If you now look again at the files in your project directory, you will notice that the build process has generated a "build" directory, that itself contains a "debug" directory:
The build/debug directory is the location where the compiled files and libraries are generated, when you build the project in debug mode.
You can also build the project in release mode, in order to enable all compiler optimizations that produce much faster as well as leaner code, but make it harder to debug using a debugger. To build the project in release mode, type:
Now you should see an additional build/release directory, which, however, does not have much content yet.
You can now proceed with the next tutorials to add some content.
| Next: Tutorial: Creating a Domain |
|---|