Contents
- Running mirapackage
- Add/Edit Repositories
- Search for Packages
- Install/Uninstall Packages
- Update Packages
- Using SVN repositories in mirapackage
mirapackage is a tool to install or uninstall Packages (like additional toolboxes or units).
Running mirapackage
To run mirapackage you typically use the command
After that, mirapackage will ask you to select the preferred checkout path if you do have more than one path in your MIRA_PATH environment variable. Please note that the default path can be changed afterwards using the menu of the main gui. After the selection has been made you will see the main user interface of the package tool.
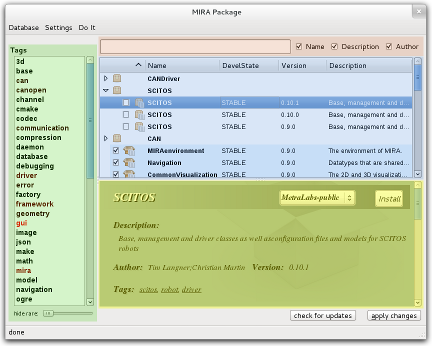
The different areas of the interface are highlighted in the image:
- blue - a list of all available packages and package groups
- yellow - detailed information about the selected package
- red - search the packages by the expression entered in the search field
- green - show only subgroups of packages in the package list view according to the selected tags
Add/Edit Repositories
The purpose of the Repositories is to provide different sets of packages. Therefore, you may wish to add some repositories in order to get access to new functionality by adding additional packages. You can do this using the repository dialog of the package tool (select "Settings" - "Repositories" from the main menu):
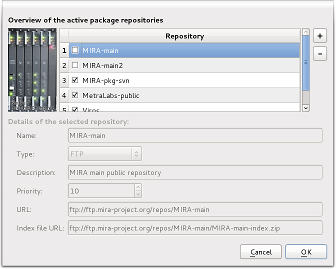
You will see a list of repositories which have already been added to your repository list. Select the "+" button at the upper right of the dialog to add a new repository. The dialog displayed afterwards will give you three different options for providing the repository information (url etc.):
- specify the url of a repository information file (*.repo)
- select a repository information file from your computer
- add the repository by providing all necessary information manually (at least you will need the url of the repository head)
The following information can be provided by repository information files or have to be given manually:
- Name - provide a name for the repository (unique within the local repository list)
- Type - select the type of the repository (AutoDetect will be fine most of the time, however, you can select SVN or FTP if you are running into trouble)
- Description - Short description of the repository (can be left empty)
- Priority - If can specify a priority value for every repository to resolve package name conflicts. If a package is contained in two different repositories, the package tool will choose the one in the repository with the higher priority by default
- URL - This is the URL of the head of the repository
- Index File URL - Examining the repository to obtain the list of packages can by very time consuming. Using index file can speed up this process significantly. Therefore, the package tool will not crawl the whole repository during a quick reindex. The package list is taken from the specified index file instead. Please note that you can bypass the index file by selecting "Database" - "thorough reindex" from the main menu
The content of the repositories is analyzed as soon as the reindex action of the package tool is triggered. The repository dialog will ask you to reindex the repositories after it has been closed. The reindex can also be triggered from the main menu ("Database" - "reindex" or "thorough reindex").
A closer look at the package list / view
The package view lists all available packages which are fitting the current search criteria. Packages with the same package name, but with different versions or different package types are grouped together. Basically there are three different types of packages:
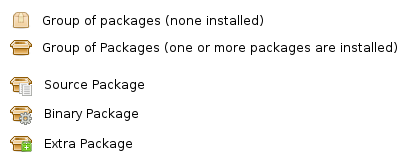
- Source packages - This package contains the source code of a module. Therefore, you have to compile the package before you can use it.
- Binary packages - Contains the precompiled version of a module (usually in combination with the header files)
- Extra packages - The package contains additional files like maps or images which are optional and usually are not required.
Please note: Multiple source packages and/or binary packages from a single module are not allowed to be installed simultaneously on a system. Therefore, the package tool constrains the maximum number of these packages to equal one.
You can identify if a package is installed on your system by having a look at the checkbox and the icon in front of each package. Furthermore, the background color of a package in the package list indicates the state of a package:
- white: the package is not installed and no changes will be applied to the package
- blue: the package is installed and no changes will be applied
- orange: the package is scheduled for install/uninstall
Search for Packages
You can search for packages using the text query at the top of the package tool (red) or you can use the tag list (green) to narrow down the list of packages visible in the package view (blue). Since the tag list can become quite long depending on the number of repositories, the slider at the bottom can be used to hide tags which are used only rarely. Please note that the final search result displayed in the package list combines the outcome from the tag search and from the text search. Therefore, both search types do constrain each other.
Install/Uninstall Packages
The install or uninstall process of packages takes place in two consecutive steps. First you select the changes to be applied to one ore more packages. Second, you have to use the apply button at the lower right of the package tool to trigger the install or uninstall actions.
Schedule install/uninstall actions
You can use the detailed package view to install/uninstall packages. Just select the package in the package list view. Select the package source of your choice from the top of the detailed package view and press the install/uninstall button at the upper right of the detailed package description. Some packages may require other packages to be installed as well (package dependencies). If these requirements are not met, the package tool will open up a dialog to install the dependencies of the selected package. Therefore, the package tool distinguishes between four different kinds of dependencies:
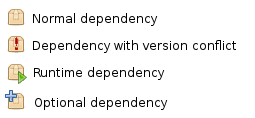
- Normal dependencies - The package requires this dependency to be compiled/executed.
- Version conflict - The package requires this software module, however, the version does not match.
- Optional dependencies - The package does not require this package to be compiles/executed but may provide additional features if the package is installed.
- Runtime dependencies - Running the package may not be useful without the dependency.
In addition to functionality provided by the detailed package view, packages can also be installed/uninstalled using the checkbox in front of each package in the package list view. Click on the checkbox and select the action or repository of your choice.
Apply changes
Use the apply button on the lower right of the package tool to apply the scheduled changes to your local installation. The following dialog will summarize the changes and gives you the option to change the install path for the different packages. The background color of each package indicates if the install path chosen by the package tool should be modified or not:
- green: everything is looking good
- yellow: the install path is looking good but is not enclosed by the mira path environment variable
- red: the package tool was not able to choose a install path for the package. Therefore you have to select a path manually to proceed.
Click the Ok button to apply the list of changes to your local installation.
Update Packages
Packages can be updated by uninstalling the older version and installing a new one. However, you can automate this process for all your installed packages by clicking on the "check for updates" button at the bottom of the mirapackage main window:

This will ask you whether you want to reindex all repositories first, which you should definitely do. This ensures that you mirapackage is aware of all changes to the repositories before looking for updates, i.e. updated / deleted / new packages.
Mirapackage will then compare the versions of all your installed packages against the most recent version of those packages known to the repositories. All packages that can be updated will then be summarized in the update dialog:
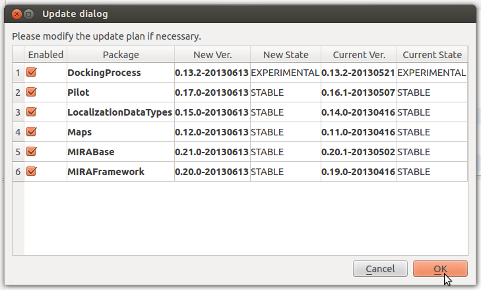
Should you decide to update (some of) these packages, mirapackage will schedule the required changes (i.e. deleting the old version, installing the new version). This means that you can still modify and verify those changes to your MIRA installation before you let the updating proceed. Click on the "apply changes" button in mirapackage to get a summary of the pending changes:
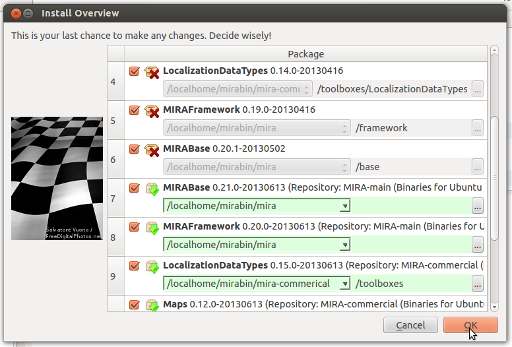
Make sure that all packages will be installed to the correct MIRA project folder and that no wrong version will be installed, then press "OK" to start the update. Once it has finished, you can check for updates again to make sure that all of your packages are up to date.

| Updating lots of packages with lots of different dependencies should be no problem, but if you want to make sure that you won't be left with an inconsistent system, you should backup your MIRA installation before updating! One easy way to do this is compressing all MIRA folders to a TAR file, e.g.: tar -zcvf MIRA_backup_040713.tar.gz /opt/MIRA /opt/MIRA-commercial Should something go wrong, you could easily restore these files again, overwriting your inconsistent or even corrupt MIRA installation: tar -zxvf MIRA_backup_040713.tar.gz If some of your MIRA folders contain |
Using SVN repositories in mirapackage
Structure for SVN repositories
To be able to use a SVN repository in mirapackage, the repository should be organized in a specific structure. Assuming, that you are using the standard structure of trunk, branches and tags the structure should look like this:
Each package (MyToolboxX, MyRobotY, MySensorZ) must provide a package file, an optional changelog file and a mountdir.xml:
Example for a package file (a detailed description can be found here: Packages):
Example of a changelog file:
Example for mountdir.xml:
You can use mirawizard to create such a structure with all necessary files.
Repository description file
Furthermore, it is possible to create a description file for your repository, which can be imported in mirapackage. Such a *.repo file must provide the following content:
Index files
Mirapackage is able to walk through the SVN repository and parse the package files, changelogs and mountdir.xml. But since this may take some time in bigger repositories, it is possible to create an index file (e.g. using a cron job). You can use the following script and adapt it to your needs.